Generate a Let's Encrypt wildcard certificate on Synology with Docker and Cloudflare
Following my setup of AdGuard Home, I found out it can manage DNS-over-HTTPS and DNS-over-TLS but it needs valid SSL certificates for that purpose.
Following my setup of AdGuard Home, I found out it can manage DNS-over-HTTPS and DNS-over-TLS but it needs valid SSL certificates for that purpose.
In addition, I was looking for a solution to generate easily a wildcard certificate to manage all subdomains applications I'm hosting on my Synology NAS without having to regenerate independently all certificates every time I launch a new subdomain.
I will explain to you how to generate quickly a valid SSL certificate for your Synology NAS self-hosted subdomains which can also be used in AdGuard Home.
Why didn't you use the Synology DSM built-in let's encrypt generator?
You might know that Synology offers an interface to generate the certificate with Let's Encrypt for you natively, nevertheless it doesn't support yet the wildcard, this is why I used an alternative way to do it.
Setting up your docker compose file
version: "2.1"
services:
  letsencrypt:
    image: linuxserver/letsencrypt
    container_name: letsencrypt
    restart: unless-stopped
    cap_add:
      - NET_ADMIN
    environment:
      - PUID=1026
      - PGID=100
      - TZ=Europe/Paris
      - URL=yourdomain.tld
      - SUBDOMAINS=wildcard
      - VALIDATION=dns
      - DNSPLUGIN=cloudflare
      - EMAIL=youremailaddress@protonmail.com
      - DHLEVEL=2048
    volumes:
      - /volume1/docker/letsencrypt:/config
Few explanations regarding this docker compose:
- URL is your domain
- SUBDOMAINS=wildcard which means it will work for *.yourdomain.tld
- VALIDATION=dns as it's the only validation method authorized to generate wildcard certificates
- DNSPLUGIN=cloudflare as I'm using Cloudflare
- EMAIL is the email you associate to your certificate, it's mandatory.
If you need more detail, you can check on GitHub.
How does it look on my Synology NAS:
letsencrypt/
      |_ docker-compose.yaml
      |_ config/
And now, you just have to launch your docker-compose file with the following command cd letsencrypt && docker-compose up -d
You will see the config folder being populated with the following folders
- crontabs
- dns-conf
- etc
- fail2ban
- keys
- logs
- nginx
- php
- www
- ...
Please monitor the logs with sudo docker logs letsencrypt to as it can take time the first time.
As soon as the startup is completed, browse your volume and open dns-conf/cloudflare.ini. You need to put in that file, your Cloudflare account email address and your Cloudflare account Global API Key so the container can manage by himself the DNS challenge to prove you are the domain owner.
You need to fill the file like this:
dns_cloudflare_email = youremailaddress@protonmail.com
dns_cloudflare_api_key = yourglobalapikey
You can now save the file and restart the container with this command sudo docker-compose restart and you can check your logs again, everything should have finished smoothly. If there are any issues, it will propose you some solutions.
2048 bit DH parameters present
SUBDOMAINS entered, processing
Wildcard cert for yourdomain.tld will be requested
E-mail address entered: youremailaddress@protonmail.com
dns validation via cloudflare plugin is selected
Certificate exists; parameters unchanged; starting nginx
Starting 2019/12/30, GeoIP2 databases require personal license key to download. Please manually download/update the GeoIP2 db and save as /config/geoip2db/GeoLite2-City.mmdb
[cont-init.d] 50-config: exited 0.
[cont-init.d] 60-renew: executing...
The cert does not expire within the next day. Letting the cron script handle the renewal attempts overnight (2:08am).
[cont-init.d] 60-renew: exited 0.
[cont-init.d] 99-custom-files: executing...
[custom-init] no custom files found exiting...
[cont-init.d] 99-custom-files: exited 0.
[cont-init.d] done.
[services.d] starting services
[services.d] done.
Congratulations, you have generated your wildcard certificate for your domain with Let's Encrypt and Cloudflare! 🎉
You can now get it by browsing your Let's Encrypt files in /etc/letsencrypt/live/yourdomain.tld . If it doesn't work, all certificates related files are also saved in /etc/letsencrypt/archive/yourdomain.tld
It's now time to use it!
If you want to use this certificate in your Synology NAS, you will need privkey1.pem and fullchain1.pem.
Just follow these few steps:
- Login to your Synology NAS DSM interface
- Open "Control Panel"
- Open "Security"
- Select the tab "Certificate"
- Click on "Add" > "Add a new certificate" > "Next"
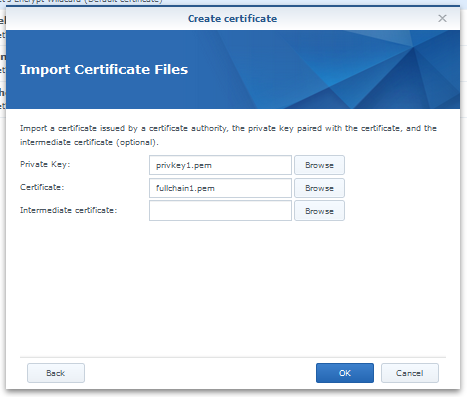
- Give it a name and select "Import certificate" > "Next"
- Set your privkey1.pem in "Private Key"
- Set your fullchain1.pem in "Certificate"
- Finish with "OK"
Your certificate is now available and can be assigned to your website! 🎉
Now let's set it up in AdGuard Home!
- Login to your AdGuard Home interface
- Open "Settings" > "Encryption settings"
- Scroll to the section "Certificates" and paste your fullchain1.pem file content inside
- Scroll to the section "Private Key" and paste your privkey1.pem file content inside
- Finish with "Save config"
Congratulations, you have setup your wildcard certificate in AdGuard Home, you can now activate DNS-over-HTTPS and DNS-over-TLS! 🎉
