Block malicious connections with CrowdSec as Intrusion Prevention System on top of SWAG
CrowdSec is a collaborative Intrusion Prevention System which make it overly powerful compared to Fail2Ban and it also provides the capability to share your setup across multiple hosts!
I recently talked to you about SWAG & SWAG Dashboard, this time I'm going to introduce to you the new Docker mod released by LSIO: swag-crowdsec!
This mod adds the CrowdSec nginx bouncer to SWAG, to be installed/updated during container start. It eases the usage of CrowdSec with SWAG so let's see how to install CrowdSec and benefit from this Docker mod.
What is CrowdSec?
CrowdSec
LSIOCrowdSec
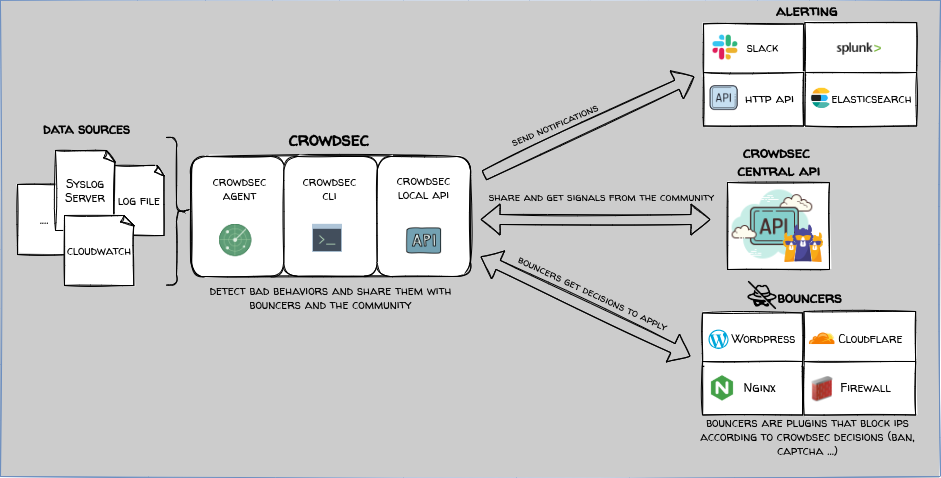
The main takeaways are that CrowdSec is a collaborative Intrusion Prevention System which make it overly powerful compared to Fail2Ban and it also provides the capability to share your setup across multiple hosts!
CrowdSec installation
First of all, we need to create required folders and add CrowdSec in our SWAG stack.
Create the configuration for CrowdSec
- Create the required folders into your SWAG stack's folder with
mkdir -p crowdsec/{crowdsec-db,crowdsec-config,dashboard} - Create the acquisition file for CrowdSec with
nano crowdsec/acquis.yaml - Fill the file with the example acquisition below from CrowdSec collection for nginx
- Save with CTRL + X
filenames:
  - /var/log/nginx/*.log
labels:
type: nginxHow it looks like on my server:
~/docker/swag
├── config
│   ├── crontabs
│   ├── crowdsec
│   ├── custom-cont-init.d
│   ├── custom-services.d
│   ├── dns-conf
│   ├── etc
│   ├── fail2ban
│   ├── geoip2db
│   ├── keys
│   ├── log
│   ├── nginx
│   ├── php
│   └── www
├── crowdsec
│   ├── acquis.yaml
│   ├── crowdsec-config
│   ├── crowdsec-db
│   └── dashboard
└── docker-compose.yml
Add CrowdSec into your SWAG stack
Now, let's open the SWAG docker-compose.yml and add CrowdSec into it!
- Open your docker compose file with
nano docker-compose.yml - Add the new service CrowdSec as below
- ℹ️ Don't forget to update the PGID to match the one used for SWAG
- Adapt the volumes paths if needed
- Save with CTRL + X
- Launch the stack with
docker compose up -dand wait for everything to be started
version: "2.1"
services:
  swag:
    # Keep here your current SWAG configuration

  crowdsec:
    container_name: crowdsec
    image: crowdsecurity/crowdsec:latest
    restart: unless-stopped
    depends_on:
      - swag
    networks:
      default:
        ipv4_address: 172.18.25.3
    environment:
      - COLLECTIONS=crowdsecurity/nginx
      - GID=1000
    volumes:
      - ./config/log/nginx:/var/log/nginx
      - ./crowdsec/acquis.yaml:/etc/crowdsec/acquis.yaml
      - ./crowdsec/crowdsec-db:/var/lib/crowdsec/data/
      - ./crowdsec/crowdsec-config:/etc/crowdsec/
    security_opt:
      - no-new-privileges=true

networks:
  default:
    driver: bridge
    driver_opts:
      com.docker.network.bridge.name: br_swag
    ipam:
      config:
        - subnet: 172.18.25.0/24
gateway: 172.18.25.255Now it's time to add a CrowdSec bouncer!
What is a bouncer?
The CrowdSec bouncers are standalone software pieces in charge of acting upon a decision taken by CrowdSec like blocking an IP, presenting a captcha, enforcing MFA on a given user, etc.
For example, the nginx bouncer will check every unknown IP against the local API before letting go through or serving a 403 to the user, while a firewall bouncer or a Cloudflare bouncer will simply "add" malevolent IPs to nftables/ipset set of blacklisted IPs.
Create a bouncer and integrate it in the configuration
You just need to run a single command to create your bouncer!
- Run
docker exec -t crowdsec cscli bouncers add bouncer-swag - It creates instantly the bouncer and print the related API key
- ℹ️ Copy the API key you will need it soon
- Open your docker compose file with
nano docker-compose.yml - Add the new environment variables DOCKER_MODS, CROWDSEC_API_KEY, CROWDSEC_LAPI_URL in your SWAG service (not crowdsec one!) as below.
⚠️ Be careful to change the IP address to target the crowdsec service's IP or replace the IP by the service name (crowdsec in my example).
⚠️If you are using the SWAG Dashboard, you need to separate both mods with a pipe. - Save with CTRL + X
- Launch the stack with
docker compose up -dand wait for everything to be started

      - DOCKER_MODS=linuxserver/mods:swag-crowdsec
      - CROWDSEC_API_KEY=916ae26c4d744fa862bcf9cdc29e30b7
- CROWDSEC_LAPI_URL=http://172.18.25.3:8080 - DOCKER_MODS=linuxserver/mods:swag-dashboard|linuxserver/mods:swag-crowdsec
- CROWDSEC_API_KEY=916ae26c4d744fa862bcf9cdc29e30b7
- CROWDSEC_LAPI_URL=http://172.18.25.3:8080Your docker-compose.yml file should look like this now:
version: "2.1"
services:
swag:
image: lscr.io/linuxserver/swag:latest
container_name: swag
restart: unless-stopped
cap_add:
- NET_ADMIN
networks:
default:
ipv4_address: 172.18.25.2
environment:
- PUID=1026
- PGID=100
- TZ=Europe/Zurich
- URL=yourdomain.xyz
- SUBDOMAINS=wildcard
- VALIDATION=dns
- DNSPLUGIN=cloudflare
- EMAIL=youremailaddress@protonmail.com
      - DOCKER_MODS=linuxserver/mods:swag-dashboard|linuxserver/mods:swag-crowdsec
      - CROWDSEC_API_KEY=916ae26c4d744fa862bcf9cdc29e30b7
      - CROWDSEC_LAPI_URL=http://172.18.25.3:8080
volumes:
- ./config:/config
ports:
- 443:443
- 80:80
crowdsec:
container_name: crowdsec
image: crowdsecurity/crowdsec:latest
restart: unless-stopped
depends_on:
- swag
networks:
default:
ipv4_address: 172.18.25.3
environment:
- COLLECTIONS=crowdsecurity/nginx
- GID=1000
volumes:
- ./config/log/nginx:/var/log/nginx
- ./crowdsec/acquis.yaml:/etc/crowdsec/acquis.yaml
- ./crowdsec/crowdsec-db:/var/lib/crowdsec/data/
- ./crowdsec/crowdsec-config:/etc/crowdsec/
security_opt:
- no-new-privileges=true
networks:
default:
driver: bridge
driver_opts:
com.docker.network.bridge.name: br_swag
ipam:
config:
- subnet: 172.18.25.0/24
gateway: 172.18.25.255👏 CrowdSec is setup! You are now protected by a community driven Intrusion Prevention System!
Few useful commands:
docker exec -t crowdsec cscli metrics
Fetch metrics from the prometheus server and display them in a human-friendly waydocker exec -t crowdsec cscli decisions list
List decisions from LAPIdocker exec -t crowdsec cscli decisions delete --all
Delete List decisions from LAPIdocker exec -t crowdsec cscli alerts flush
Flush alerts -⚠️ This command can be used only on the same machine than the local API
If you need more commands, please refer to the official documentation.
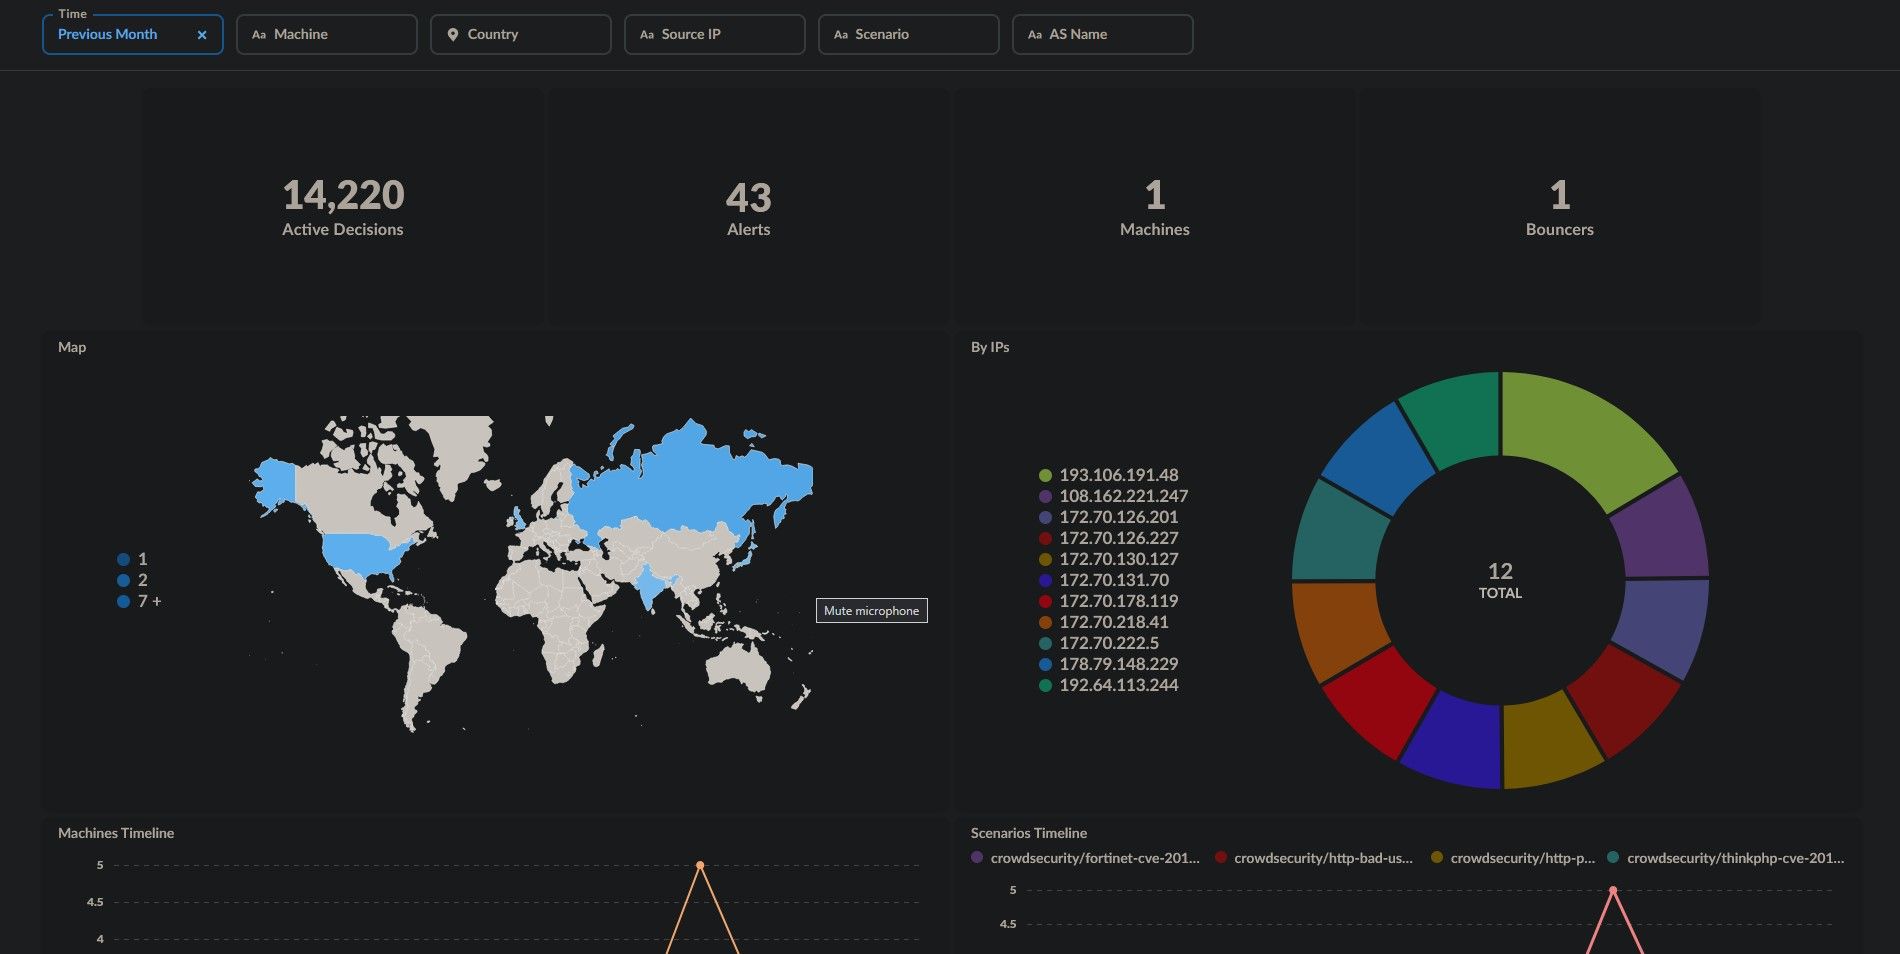
Create a CrowdSec dashboard
We like dashboards, yes we ❤️ dashboards so let's create one for CrowdSec with Metabase!
version: "2.1"
services:
  swag:
    # Keep here your current SWAG configuration

  crowdsec:
    # Keep here your current CrowdSec configuration

  dashboard:
    container_name: crowdsec-dashboard
    build: ./crowdsec/dashboard
    restart: unless-stopped
    depends_on:
      - crowdsec
    networks:
      default:
        ipv4_address: 172.18.25.4
    ports:
      - 1111:3000
    environment:
      - MB_DB_FILE=/data/metabase.db
      - MGID=1000
    volumes:
- ./crowdsec/crowdsec-db:/metabase-data/- Go in the dashboard folder created before (I knew you like dashboards!) with
cd crowdsec/dashboard - Get the Dockerfile provided by LSIO with
wget https://raw.githubusercontent.com/crowdsecurity/example-docker-compose/main/crowdsec/dashboard/Dockerfile - Add the dashboard service in your
docker-compose.ymlfile like above - Save with CTRL + X
- Launch the stack with
docker compose up -dand wait for everything to be started - Access your dashboard on
https://your-host-ip:1111 - Default's credentials are
crowdsec@crowdsec.netand!!Cr0wdS3c_M3t4b4s3??
🎉 Congrats! You can now browse the dashboards prepared for you and even create your owns!
Link your instance to CrowdSec Console
You can also decide to link your CrowdSec instance to the CrowdSec Cloud Console to monitor alerts and manage several instances.
- Create an account on https://app.crowdsec.net
- After login, you will see a command to enroll your instance, execute it through Docker with
docker exec -it crowdsec cscli console enroll thisisyourtoken - Go back to the website to accept the enrollment
- Restart CrowdSec with
docker restart crowdsec
You can now monitor your instance from the CrowdSec Console!
Resources to go deeper:
- https://www.linuxserver.io/blog/blocking-malicious-connections-with-crowdsec-and-swag
- https://github.com/crowdsecurity
- https://github.com/crowdsecurity/cs-nginx-bouncer/
- https://github.com/linuxserver/docker-mods/tree/swag-crowdsec
- https://crowdsec.net/
- https://doc.crowdsec.net/docs/cscli/cscli
- https://hub.crowdsec.net/author/crowdsecurity/collections/nginx
- https://blog.thelazyfox.xyz/setup-swag-to-safely-expose-your-self-hosted-applications-to-the-internet/
Big Up EVO for support! ♥
